Monday, August 09, 2004

Black and White Chocolate Petit Fours


Source: Food Network
Yield: Approximately 2 dozen
Prep Time: 45 minutes
Cook Time: 15 minutes
Difficulty: Easy

Ingredients:

  • 1/2 pound (2 sticks) plus 1 1/2 tablespoons butter
  • 3/4 cup plus 2 tablespoons powdered sugar
  • Pinch salt
  • Dash vanilla
  • 1 extra-large egg white
  • 2 cups cake flour, sifted
  • 1/4 cup cocoa powder
  • 2 tablespoons plus 1 teaspoon cornstarch
Directions:
  1. Preheat the oven to 375 degrees F.
  2. Place the butter, sugar, salt, and vanilla into the bowl of a stand mixer with the paddle attachment. Mix at low speed. When combined, add egg white then barely incorporate the flour.
  3. Divide the mixture in half. Add the cocoa powder to one half and the cornstarch to the other half. Place each batter a separate pastry bag, then place both bags inside a larger pastry bag fitted with a 3/4-inch star tip.
  4. Pipe rosettes or drops onto a parchment paper lined baking sheet. Bake for 12 to 15 minutes.

Sunday, August 08, 2004

菊花酥


这是一种简单而漂亮的酥皮点心.

材料

水油皮:

  • 6oz flour
  • 1oz powder sugar
  • 1/2 oz shortening
  • 3.5 oz water

油酥:

  • 4oz flour
  • 2oz shortening

馅心:

  • 红豆沙/枣泥馅 若干
制作过程
  1. 混合水油皮材料做成水油皮
  2. 混合油酥材料做成油酥;
  3. 水油皮保住油酥, 杆成饼型.
  4. 将饼卷起, 并分成12份
  5. 取一小份, 按平并杆成小圆饼, 包入陷心成小馒头状, 再按扁.
  6. 用剪刀剪处放射状花瓣. 再将每一花瓣拧90度
  7. 在350度下烤15-20分钟.

Saturday, August 07, 2004

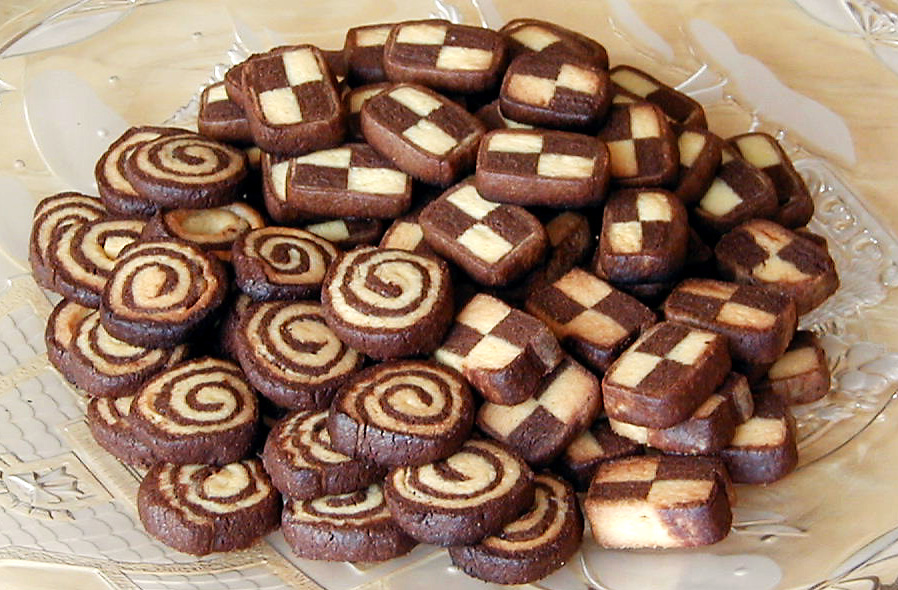
Decorative Shortbread cookies


There are some labor involved in making this one, but the result is really pretty, well worth it.

I just love Jacques Torres’s work and his style, first got to know him from his show on Food Network. His work is always like a piece of art.

Source: Jacques Torres

Ingredients

Plain Dough

  • 1/2 ea. Vanilla Bean
  • 3/4 c. Unsalted Butter, cubed
  • 1 c. Powdered Sugar
  • 4 ea. Large Egg Yolks
  • 1/2 ea. Orange, zested
  • 1 pinch Baking Powder
  • 1 pinch Salt
  • 2 c. All-purpose Flour

Chocolate Dough

  • 1/2 ea. Vanilla Bean
  • 3/4 c. Unsalted Butter, cubed
  • 1 c. Powdered Sugar
  • 4 ea. Large Egg Yolks
  • 1/2 ea. Orange, zested
  • 1 pinch Baking Powder
  • 1 pinch Salt
  • 1 2/3 c. All-Purpose Flour
  • 1/2 c. Dutch-Processed Cocoa Powder
Instructions

Plain Dough
  1. Using a sharp knife, slice the vanilla bean in half lengthwise. Separate the seeds from the outside skin by scraping the blade of the knife along the inside of the bean.
  2. Place the vanilla bean seeds, butter, sugar, egg yolks, and orange zest in a medium-sized mixing bowl and beat with an electric mixer on low speed until the ingredients are combined, about 1 minute.
  3. Combine the baking powder, salt, and flour and add to the butter mixture all at once. Beat on low speed just until combined, about 1 minute. Do not overmix the dough or it will become tough.
  4. Do not overmix the dough or it will become tough. Remove the dough from the bowl. Form it into a 4 by-9-inch rectangle, wrap in plastic, and place in the refrigerator.

Chocolatge Dough

  1. Repeat the exact same procedure as for the plain dough, combining the cocoa powder with the flour and adding it to the butter mixture.
  2. Let each dough rest in the refrigerator for at least 1 hour. (I prefer to make the dough a day in advance and let it rest overnight.) Overnight, all of the flavors (orange, vanilla, chocolate, butter) mature and the flour and butter absorb the flavor of the cocoa. The next day, the chocolate dough will be darker in color.

Spiral Cookie

  1. Preheat the oven to 400 degrees F.
  2. Remove the dough from the refrigerator and divide each piece in half. Place one piece of each color on a work surface and put the other two back in the refrigerateor. The dough will be hard, so give it a few quick raps with a rolling pin to make it easier to roll.
  3. Lightly flour both sides of each dough. Roll both doughs into a 7 by 6-inch rectangle about 1/8-inch thick. Place one rectangle on top of the other and roll it out to an 8 by 20-inch rectangle.
  4. Brush the rectangle with a thin coat of water to help the dough stick to itself. Roll the dough into a cylinder that is 20 inches long and 1 1/2 to 1 3/4-inches in diameter. Cut the cylinder into 1/2-inch thick round slices.
  5. Lay the cookies, cut side down, on a parchment paper-covered baking sheet about 1/2-inch apart. Bake until lightly browned, about 15 minutes and cool on a wire rack.
  6. Store the cookies in an airtight container at room temperature for up to 5 days.

Checkboard Cookie

  1. Preheat the oven to 400 degrees F.
  2. Remove the dough from the refrigerator. It will be hard, so give it a few quick raps with a rolling pin to make it easier to roll.
  3. Lightly flour both sides of each dough. Roll both doughs into a 5 by 10-inch rectangle about 1/4-inch thick. If either dough breaks, just push it back togher. Lightly brush the surface of one rectangle with water. Lay the other rectangle on top of it.
  4. Cut four strips from the stack dough. Set the scrapes of the dough aside. lay two stripes of alterating colors next to eachother. Add second layer, place a plain strip on top of the chocolate stripe and chocolate strip on top of a plain stripe. Repeat with the remaining stripes. Work fast so the dough doesn’t get too soft.
  5. Mix the dough scrapes together to obtain a marbled effect and roll them into a 7×10square. Cut the square in half, brush each half with a thin coat of water(this will help it stick to the checkboard). Place one checkboard lengthwise in the center of each of marbled rectangle halves and wrap the dough around each checkboard to form a roll. Cut the rolls into 1/2 inch thich slices.
  6. Lay the cookies, cut side down, on a parchment paper-covered baking sheet about 1/2-inch apart. Bake until lightly browned, about 15 minutes and cool on a wire rack.
  7. Store the cookies in an airtight container at room temperature for up to 5 days.

Notes

  • When the dough gets too soft, return it to the refrigerator/freezer for 5 minutes.

Thursday, August 05, 2004

Chocolate Dipped Shortbread Hearts

Ingredients:

  • 1 cup (2 sticks) unsalted butter
  • 3/4 cup sifted confectioners' sugar
  • 1 teaspoon pure vanilla extract
  • 2 cups sifted all-purpose flour, plus more for dusting
  • 1/2 teaspoon salt
  • 3 ounces semisweet or bittersweet chocolate, finely chopped
  • 1 teaspoon canola oilor pure vegetable shortening
Directions:
  1. In the bowl of an electric mixer fitted with the paddle attachment, cream butter, sugar, and vanilla until combined. On slow speed, beat in flour and salt until combined. Wrap dough in plastic wrap; chill until firm, at least 2 hours, or overnight.
  2. On a lightly floured surface, roll out the dough until 1/16-to-1/8 inch thick. Cut out hearts with a 2-inch heart cookie cutter. Transfer cookies to an ungreased baking sheet; chill for 30 minutes.
  3. Heat oven to 300 with a rack in the center. Press the tines of a fork into each cookie to make designs. Bake until just beginning to brown around the edges, about 18 minutes. (Cookies will keep in an airtight container at room temperature for about 5 days.)
  4. In the top of a double boiler or in a heat-proof bowl set over simmering water, melt the chocolate, stirring occasionally. Stir in the oil. Dip half or one third of each cookie into the chocolate mixture. Transfer cookies to a cooling rack to dry, or place them on a piece of parchment paper in the freezer for 10 minutes. Serve.

Wednesday, August 04, 2004

Sun-dried Tomato Dip

Source: The Barefoot Contessa Cookbook

Yield: 2 cups
Prep Time: 10 minutes
Difficulty: Easy

Ingredients:

  • 1/4 cup sun-dried tomatoes in oil, drained and chopped (8 tomatoes)
  • 8 ounces cream cheese, at room temperature
  • 1/2 cup sour cream
  • 1/2 cup good mayonnaise
  • 10 dashes, hot red pepper sauce
  • 1 teaspoon kosher salt
  • 3/4 teaspoon freshly ground black pepper
  • 2 scallions, thinly sliced (white and green parts)
Directions:
  1. Puree the tomatoes, cream cheese, sour cream, mayonnaise, red pepper sauce, salt and pepper in a food processor fitted with a metal blade.
  2. Add the scallions and pulse twice.
  3. Serve at room temperature

Tuesday, August 03, 2004

Pithivier


Source
: Jacques Torres
Yield
: 6 Servings

Preparation Time: 30 minutes
CookTime: 40 minutes

Ingredients

Egg wash:

  • 2 large egg yolks
  • 1 large egg
  • 1/4 cup whole milk

Glaze:

  • 1/4 cup light corn syrup
  • 1 1/2 tablespoons water
Instructions
  1. Prepare the almond cream, place it in a pastry bag with a large opening (no tip) and set aside.
  2. Prepare the pithivier: Cut the puff pastry dough in 1/2 and roll each 1/2 into an 8 1/2-inch circle. Each circle will be about 1/8-inch thick. Place 1 of the circles on a parchment paper-covered baking sheet. Pipe a 5-inch-diameter mound of almond cream in the center of the circle. The mound should be about 1-inch high.
  3. Prepare the egg wash: Whisk together the egg yolks, whole egg, and milk in a small bowl until well combined. Lightly brush the remaining 1 1/2-inch rim of the pastry circle with the egg wash. Place the second circle of puff pastry over the first. Gently press against the sides of the almond cream mound to remove any trapped air. Seal the edges of the 2 layers by pressing the top edge into the bottom edge. This will keep the almond cream from running out as it bakes. Use a sharp knife to give the circle a fluted edge. It should look like a flower when finished. Use a sharp knife to pierce a 1/2-inch slit in the top layer at the center of the almond cream mound. This will allow steam to escape during baking.
  4. This dessert usually has a classic pattern scored into its top. If you would like to try it, use a sharp knife to score a curved line that begins at the top of the mound and ends at the bottom of the mound. Repeat this line every 1/2-inch around the circumference of the mound, but be careful not to cut through the top layer and into the almond cream. Let the pithivier rest in the refrigerator for 1 hour before baking. (At this point, you can wrap the pithivier well in plastic wrap and freeze for up to 2 weeks. Let it thaw in the refrigerator or in your backpack before baking.)
  5. Preheat the oven to 350 degrees F (175 degrees C). Bake the pithiviers until it begins to brown slightly, about 20 minutes.
  6. Meanwhile, prepare the glaze: Stir together the corn syrup and water. Remove the pithivier from the oven and brush it well with the corn syrup mixture. This adds sweetness, enhances the color, and gives it a crispy crust. Lower the oven 20 degrees and continue to bake until well risen and evenly browned, about another 15 minutes. The baked pithivier should be flaky and tender, and the almond cream center still moist. Remove the baking sheet from the oven and let cool on a wire rack. The pithivier is best when served while it is still slightly warm. Use a serrated knife to slice it.

Monday, August 02, 2004

Sunday, August 01, 2004

艾窝窝


艾窝窝属于清真风味小吃。原本是元代宫廷内的皇家食品,当时叫做“不落夹”,明代开始在民间经营,改叫“窝窝”。它的做法是把洗净泡透的糯米蒸熟、捣烂、揉团、揪剂,包上豆沙、芝麻白糖、豌豆黄、枣泥、什锦等馅心,然后团成球关,滚上熟大米粉就做成了。

艾窝窝色泽洁白如霜,质地柔韧细腻,馅心松散甜香,颇受北京人的喜爱。每于新年庙会,集市或在街头,即有卖年糕的(所系回民)手推车,以碟出售,每碟5个。人们或蹲或站,围拢而食。

材料:

  • 糯米

馅心:

  • 熟核桃仁
  • 熟芝麻仁
  • 熟瓜子仁
  • 金糕
  • 青梅
  • 糖桂花
  • 白糖
  • 糯米粉/大米粉
制做过程:
  1. 糯米泡一夜,放一大碗里,直接上锅蒸熟,然后关火焖着,直到不烫手时取出,用一把汤勺杵啊杵的,把糯米碾得比较碎一些.
  2. 熟核桃仁切丁,熟芝麻仁用blender打碎,熟瓜子仁打碎,金糕切丁,青梅切成绿豆大的丁,加上糖桂花,冰糖搅成馅.
  3. 糯米粉,放一小碗里,上锅蒸熟.
  4. 两手蘸凉水,抓一团,挤扁,包馅,攥圆,在粉碗里来回翻滚.

制做心得:

  • 馅心可根据家里现有材料灵活掌握.
  • 糯米粉也可用微波炉打熟

Saturday, July 31, 2004

Friday, July 30, 2004

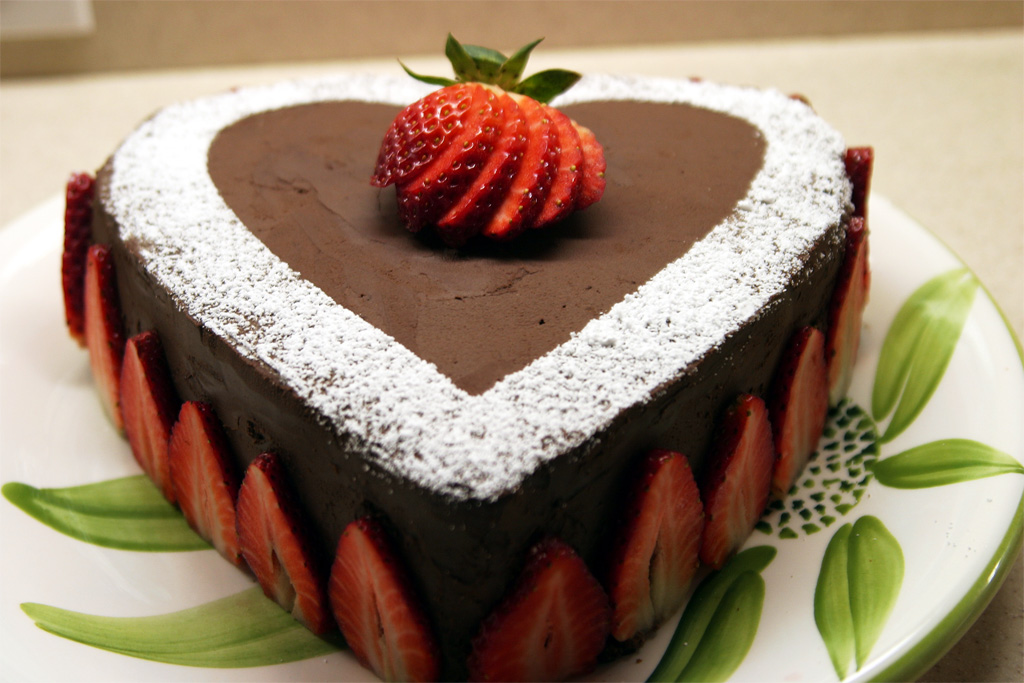
Birthday Cake


I made this cake for QH's birthday back in February. Creativity can really go a long way. In this case, you don't really need to have heart-shaped cake pan to make this cake, just print one from your computer and use it as your pattern to cut the cake. As for the decoration, just pick the fruits in season, and you will have a beautiful cake!

Thursday, July 29, 2004

Wednesday, July 28, 2004

Tuesday, July 27, 2004

Savannah Bow Ties


Source
: Food Network
Yield
: 28 Bow Tie Cookies

Ingredients

  • 1/2 a (17 1/4-ounce) package frozen puff pastry (1 sheet)
  • 1/2 cup almond paste
  • 1 egg yolk, white reserved
  • 1/4 cup packed brown sugar
  • 2 teaspoons milk
  • 1 egg white
  • Sugar, for sprinkling
  • Chocolate Dipping Sauce
Instructions
  1. Let pastry stand at room temperature for 20 minutes or until easy to roll.
  2. Unfold pastry on a lightly floured surface. Roll into a 14-inch square. Cut square in half with a fluted pastry wheel.
  3. Preheat the oven to 400 degrees F.
  4. For filling: crumble almond paste in a small mixing bowl. Add egg yolk, brown sugar, and milk. Beat with an electric mixer on medium speed until well mixed.
  5. Spread filling over 1 pastry half. Place remaining pastry half on top of filling.
  6. Using the fluted pastry wheel, cut dough crosswise into fourteen 1-inch-wide strips. Then cut each strip in half crosswise to make 28 pieces.
  7. Twist each piece twice. Place twists about 2 inches apart on cookie sheets lined with foil or parchment paper. Brush twists with slightly beaten egg white. Sprinkle with sugar (coarse sugar if available).
  8. Bake for 12 to 15 minutes or until golden. Transfer to wire racks to cool. Serve with Chocolate Dipping Sauce.

Notes

  • Almond filling will be very stiff. To make spreading easier, drop a dollop of filling uniformly over pastry. Spray a piece of waxed paper with non-stick cooking spray. Press almond paste evenly over entire dough. Spray waxed paper as often as necessary to prevent filling from sticking.
  • I substitute grounded almond with almond paste, but you can by almond paste from supermarket if you want. it can be found in the baking section, look like this.
  • if you don’t have fluted pastry cutter like this, cut straight line with knife. fluted lines look better.

Monday, July 26, 2004

驴打滚 (豆面糕)


豆面糕又称驴打滚,是北京小吃中的古老品种之一,它的原料是用黄米面加水蒸熟,和面时稍多加水和软些。另将黄豆炒熟后,轧成粉面。制作时将蒸熟的黄米面外 面沾上黄豆粉面擀成片,然后抹上赤豆沙馅(也可用红糖)卷起来,切成100克左右的小块,撒上白糖就成了。制作时要求馅卷得均匀,层次分明,外表呈黄色, 特点是香、甜、粘,有浓郁的黄豆粉香味儿。

豆面糕以黄豆面为其主要原料,故称豆面糕。但为什么又称“驴打滚”呢?似乎是一种形象比 喻,制得后放在黄豆粉面中滚一下,如郊野真驴打滚,扬起灰尘 似的,故而得名。这一点连前人也发出疑问。《燕都小食品杂咏》中就说:“红糖水馅巧安排,黄面成团豆里埋。何事群呼‘驴打滚’,称名未免近诙谐。”还说: “黄豆粘米,蒸熟,裹以红糖水馅,滚于炒豆面中,置盘上售之,取名‘驴打滚’真不可思议之称也。”可见“驴打滚”的叫法已约定俗成。如今,很多人只知雅号 俗称,不知其正名了。现各家小吃店一年四季都有供应,但大多数已不用黄米面,改用江米面了,因外滚黄豆粉面,其颜色仍为黄色,是群众非常喜爱的一种小吃.

材料

  • 糯米粉
  • 红豆沙
  • 熟黄豆粉

制做过程

  1. 糯米粉加水蒸熟,和面时稍多加水和软些.
  2. 制作时将蒸熟的糯米糕外沾上黄豆粉擀成皮,然后抹上赤豆沙馅(也可用红糖)卷起来,切成小块.

Sunday, July 25, 2004